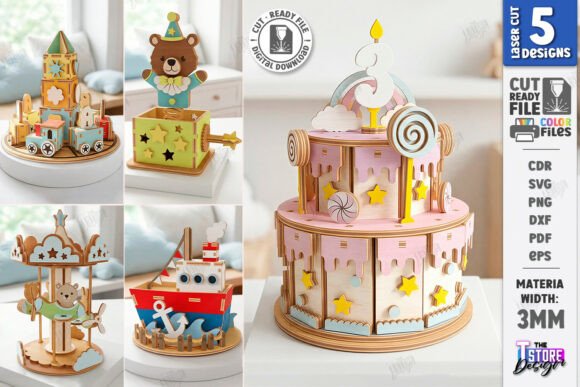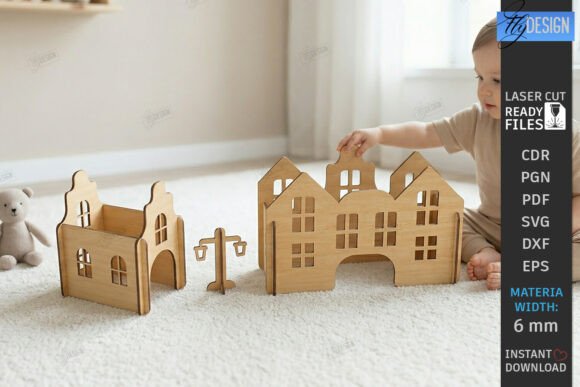
Mastering the Montessori Toy Town Laser Cut Play Set for Precision and Play
Creating a tangible, interactive world for children is one of the most rewarding projects a maker can undertake. The Montessori Toy Town Laser Cut Play Set represents more than just a collection of wooden shapes; it is an invitation to engage in open-ended, imaginative play that aligns with educational philosophies emphasizing independence and creativity. Whether you are a hobbyist with a Glowforge, a small business owner selling on Etsy, or an educator looking to build classroom resources, understanding the nuances of this digital download is crucial. Many creators rush into cutting without fully appreciating the technical and pedagogical details, leading to wasted materials and frustrated customers. This guide aims to clarify those details, helping you avoid common pitfalls and achieve a professional, durable result.
Understanding the Digital Foundation
Before your laser beam ever touches plywood, you must understand what you are buying. This product is a digital asset, specifically a zip archive containing SVG, EPS, PNG, PDF, and DXF files. It is not a physical toy shipped to your door. A frequent misunderstanding among beginners is assuming that all file formats behave identically across different software platforms. For instance, while SVG is universally accepted by most modern laser cutters like Glowforge and xTool, DXF might be preferred for older industrial CNC machines. Ignoring compatibility checks can lead to distorted dimensions or missing vector paths.
Another overlooked detail is the color-coding instruction: RED line – CUT, BLACK line – ENGRAVE. This seems simple, but in practice, software interpretation varies. Some programs automatically assign power settings based on color, while others require manual input. If you fail to verify these settings in your specific software, you might find your machine attempting to engrave a cut line, resulting in a piece that remains attached to the sheet, or worse, burning through a section meant only for surface detailing. Always perform a test run on scrap material of the same thickness to calibrate your speed and power.
Material Selection and Structural Integrity
The choice of wood significantly impacts the final quality of your Montessori Toy Town Laser Cut Wooden City Play Set. Many creators opt for the cheapest birch plywood available, unaware that lower-grade sheets often contain voids or inconsistent layers. When laser cutting, these voids can cause uneven cuts, requiring excessive sanding or resulting in weak joints that fall apart during play. For a slot-together building kit, precision is paramount. If the slots are too loose due to poor material quality or incorrect kerf compensation, the structures will wobble. If they are too tight, children may struggle to assemble them, defeating the purpose of fostering independence.
A better approach is to source high-quality, formaldehyde-free plywood specifically rated for laser cutting. These materials burn cleaner, produce less soot, and have consistent layer adhesion. Additionally, consider the thickness specified in the design files. If the designer optimized the slots for 3mm plywood, using 4mm wood will result in pieces that simply do not fit together. Always measure your material with calipers before starting a batch production run. This small step saves hours of post-processing frustration.
Pedagogical Alignment and Safety Considerations
When marketing or using this set as a Waldorf Style Wooden Toys alternative, it is essential to understand the underlying educational principles. Montessori and Waldorf methodologies emphasize natural materials, simplicity, and realism. Over-decorating the town with bright, synthetic paints can detract from this aesthetic. The minimalist nursery decor appeal lies in the natural grain of the wood and the clean lines of the architecture. Resist the urge to over-engrave or add excessive detail that clutters the visual field. The goal is to provide a neutral canvas for the child’s imagination, not a prescriptive scene.
Safety is another critical area where mistakes are commonly made. Laser cutting produces charred edges that can splinter if not properly finished. For toys intended for young children, sanding is not optional; it is a necessity. Use a tumbler with walnut shells or hand-sand each piece to ensure smooth edges. Furthermore, verify that any finishes you apply are non-toxic and child-safe. Beeswax or plant-based oils are excellent choices that enhance the wood grain without introducing harmful chemicals. Neglecting this step can lead to safety hazards and negative reviews from concerned parents.
Optimizing for Efficiency and Scalability
For entrepreneurs and small business owners, efficiency translates directly to profitability. A common error is cutting pieces individually rather than nesting them effectively on the sheet. Proper nesting reduces material waste and minimizes machine runtime. Take time to arrange your SVG files within your design software to maximize the use of each plywood sheet. Additionally, consider the order of operations. Engraving before cutting is generally safer, as it prevents pieces from shifting during the detailed marking process. If you cut first, the individual pieces may move, causing misaligned engravings.
Another aspect of scalability is file management. Keep your original ZIP archive backed up in multiple locations. If you modify the design for a custom order, save it as a new version rather than overwriting the original. This ensures you always have access to the baseline Educational Plywood House Template for future standard orders. Clear organization prevents costly errors when fulfilling multiple orders simultaneously.
Final Checks Before Production
Before committing to a full production run, conduct a thorough review. Check the following:
- File Compatibility: Ensure your software correctly interprets the SVG or DXF paths.
- Color Settings: Verify that red lines are set to cut and black lines to engrave.
- Material Thickness: Confirm your plywood matches the design specifications.
- Kerf Compensation: Adjust for the width of the laser beam to ensure snug fits.
- Test Fit: Assemble one complete unit to check for structural integrity.
If you encounter issues with file types or need specific adjustments, such as a different color size for the PNG file, reach out to the designer. Most creators are willing to assist with minor modifications to ensure customer satisfaction. Communication is key to resolving technical discrepancies quickly.
By approaching the Montessori Toy Town Laser Cut Play Set with attention to detail, material quality, and educational intent, you create a product that is not only visually appealing but also durable and meaningful. Avoid the shortcuts that compromise quality, and instead, focus on the craftsmanship that defines exceptional wooden toys. This mindful approach ensures that your final creation serves its purpose: inspiring creativity, fostering learning, and bringing joy to children through the simple beauty of well-made wooden structures.